Showing posts with label android app. Show all posts

Tuesday, 29 August 2017

Android App Widgets tutorial with Example

Android App Widgets

Android widgets are views that can be placed on the home screen and are updated periodically. They could be a great options for frequent user interactions with your application without opening the application. They are basically the broad cast receivers which display some data and interacts with the users.
android app widget - android tech point
Resizable Android App Widget - Android Tech Point

Steps to create the widget

Creating android widgets is a simple task. You only need to follow simple steps:

  • Create the xml layout file.
  • Define the XML file (i.e AppWidgetProviderInfo) which includes properties for the widget like size, updating interval, minimum size, resizability etc.
  • Create the java file which will have the callback methods for the app widget.
  • Define the receiver for the widget in the AndroidManifest.xml.
  • (Optional) Configuration activity which is called when a new instance of the app widget is made.

Available view in Android App Widgets

Widgets has some limitations. You can only use few views in the xml of widgets. They are as follows:
  1. AnalogClock
  2. Button
  3. Chronometer
  4. ImageButton
  5. ImageView
  6. ProgressBar
  7. TextView
  8. ViewFlipper
  9. ListView
  10. GridView
  11. StackView
  12. AdapterViewFlipper
And the layout which are supported by the remote views are:
  1. FrameLayout
  2. LinearLayout
  3. RelativeLayout
  4. GridLayout
The subclasses of these views are not supported.

Creating Android App Widgets

Now let's dive into the code to create the widgets. You can get the complete project at Github Repository. Or you can get the code below in this post. We will follow the steps defined in the above portion.

  1. Create the xml layout file.
    Here we will define the layout for our widget just like the regular android xml layout.
  2. Define the XML file (i.e AppWidgetProviderInfo) which includes properties for the widget like size, updating interval, minimum size, resizability etc.
  3. Create the java file which will have the callback methods for the app widget. In some cases onAppWidgetOptionsChanged()  is not called on the creation of app widget as it should according to offical docs, so you need to set the UI of widget in onUpdate()  to be on safer side.
  4. Define the receiver for the widget in the AndroidManifest.xml. You need to define the receiver inside the activity tag. Also give the meta tag.
Important

That's all. Enjoy the resizable widget for your application. In case of any queries I am always here, comment below or contact me at farooqahmadkhan003@gmail.com.


Sunday, 13 August 2017

Android Activity Life Cycle Tutorial with example


Android Activity Life Cycle

Importance of Activity's Life cycle

Understanding Android Activity Life cycle is one of the most important things for android developers. Using the activity life cycle correctly can avoid your application from:
  • Losing the user data when the screen orientation changes
  • Crashing of application while switching between applications
  • Consuming valuable resources of the phone while the user is not using you app
  • Losing the users data when user leaves you app and return later
Here an important point is, the activity is recreated with the phone's orientation is changes. So to give your users best experience, you need to take care of this too.

Activity Life cycle Callbacks

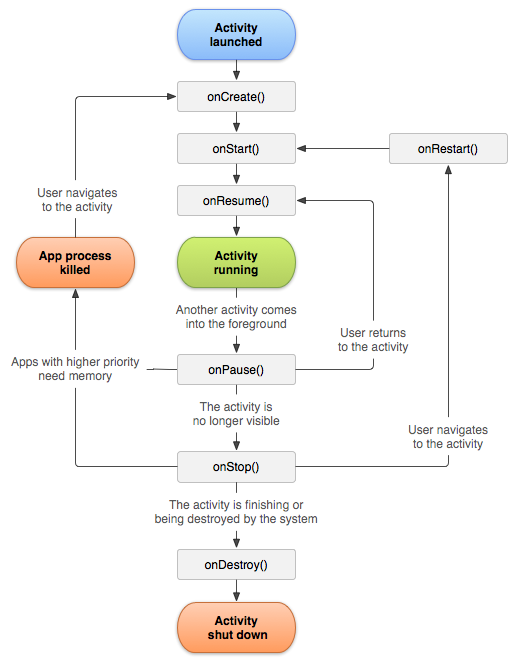
To give the users of your application best user experience, it is very important to understand the activity life cycle. To manage you activities, android provides various callbacks on different stages of activity life cycle. They are listed below:
  1. onCreate()
  2. onStart()
  3. onResume()
  4. onPause()
  5. onStop()
  6. onRestart()
  7. onDestroy()
They all are called on different stages of activity life. To understand which callback is called when, see the table and image from the official documentation of android below carefully. And also see the demo project running given at the end of the tutorial.
Android Activity Life Cycle


MethodDescription
onCreatecalled when activity is first created. You must implement this callback.
onStartWhen the activity enters the Started state, the system invokes this callback. The system prepares to enter the activity to foreground.
onResumecalled when activity will be in visible form to the user. This is the state in which the app interacts with the user.
onPausecalled when activity is not in focus. It is the first indication that the user is leaving the activity. It does not mean that activity is going to destroy. When a new dialog(popup) or multi window in android 7.0 and higher is made, it is also called as the app loses the focus.  
onStopcalled when activity is no longer visible to the user. It usually happens when a new activity is launched.
onRestartcalled after your activity is stopped, prior to start.
onDestroycalled before the activity is destroyed. After that your activity will be removed from the memory.

Save the State of your App

To save the state of your application, android provides two callbacks onSaveInstanceState(Bundle savedInstanceState) and  onRestoreInstanceState(Bundle savedInstanceState). From these two callbacks, you can save and restore the data and make the user experience better. These callbacks are called when the orientation of the app is changed or app is brought to foreground again. onSaveInstanceState(Bundle savedInstanceState) is called after onPause() and similarly onRestoreInstanceState(Bundle savedInstanceState) is called onStart() method.

Demo Project

To understand the activity life cycle more clearly, run the demo project at  Github Repository. Here you will see all the callbacks in action and also learn how you can save the user data and make the better user experience. If you want to know anything about it or having some confusing, feel free to comment or contact me at farooqahmadkhan003@gmail.com


Tuesday, 8 August 2017

Android Custom Views with Examples

Android Custom Views

Some times we need very personalized views or you can say very personalized behavior of the android views. For this purpose android provides the support for the custom views. We can create our own views and define there behavior as our needs.
If we just need to make the little adjustments to the existing views like Button, EditText, ListView, Layouts or any other view, we can simply do that by extending the predefined view to our own classes and change there characteristics.

Use Case

Some of the example use cases for custom views are as follows:
  • A control with some predefined images.
  • Group of perdefined views to use throughout our app.
  • Change look and feel of predefined views.
  • Custom behavior on onClick(), onFocusChanged(), onLongPressed() etc. events.

@Override

You can override a list of method of the views after extending them to your own class you change there behavior. You can override
  • onDraw()
  • onMeasure()
  • onKeyDown()
  • setMeasuredDimension(int width, int height)
and many more methods. Now your methods will be called instead of the parent class on the specified events. All you have to do is use your own class name in the XML to use them and provide there attributes.

Example

For an example, we will create our own image view which shows the square images rather than the original dimension of the image. For this purpose, all we have to do is just extend the imageView class to our own class and define the custom behavior. following is the code for the class.

SquareImage.java
Now to use this class, all you have to do is
Similarly, if you want to change the font of all the EditTexts of your app, you just need to extend the already existing Edittext with you class and change the font style. You can find the class as follow:

CustomEditText.java

You can a sample application with two different custom components at Github Repository. All you need to do is create res/values/attr.xml. Then create the layout xml file with the the view in res/layout. And finally write the java class to inflate the view and set the values for the views. You are done! Just enjoy using the component.
If you still get the error feel free to comment below or contact me at farooqahmadkhan003@gmail.com. Happy Coding!!

Saturday, 11 February 2017

Sending POST Request to Internet Using Android Volley

android volley library - android tech point
Android Volley Library Tutorial

Android Volley is an library for network operations in android development. It is a very light weight framework and most importantly, very fast for network operations. It has facility to get the raw string, image or JSON data over the network efficently. One of the benifit that I like the most if you can easily use volley in your activity as it automatically sends the request in separate thread. And also maintains a queue for the requests.
Note that volley is not for large data downloads as it holds all the data in memory. For large downloading use the DownloadManager.
Here is the demo video for this app.

Dependency for android volley

Minimum requirement for android volley Android 2.2 (API Level 8) or higher. Now come towards tutorial for android volley.

Steps for using Volley

  • Add the uses-permission in Android Manifest.xml file.
    <uses-permission android:name="android.permission.INTERNET"/>
  • Add the dependency in build.gradle (Module: app)
    compile 'com.android.volley:volley:1.0.0'
  • Write code for sending request in MainActivity.java
  • Write the server side code. I am using xampp and sending request to localhost. Follow tutorial here to configure xampp for accessing from other devices.
You can get the complete project at Github Repository. Or you can get the code below in this post.

MainAcitivty.java

activity_main.xml

androidvolley.php

In case of error

If you get some error, the first thing you should check is permissions in android androidManifest.xml and build.gradle. If you still get the error feel free to comment below or contact me at farooqahmadkhan003@gmail.com.

Monday, 30 January 2017

Android App for Login Sign Up Using Android Volley and php

In this tutorial we are going code back-end for the Android App we build in other tutorial. For this we will use Android Volley to send request on server. Fortunately, Android studio does most of this part too. We only need to send the request for the login authentication or sign up from our android app.

Which is so simple using android volley and with piece of code, but I made some other changes too in the automatically generated code for our app. Read the comments in the code to understand the code completely. The main changes are:
  • Removed the Async Class as the android volley automatically send the network requests in threads. Android Studio add the async class for the network operations as no network operation can be performed in the main thread.
  • Remove all the relevant code to the async class.
  • Paste the url of your server in string.xml and also change the file name accordingly in the java files. You can make your laptop a server using xampp. Follow the tutorial here for further instructions if you get troubled.
I think that is pretty much all. The rest of code is same. Now move on the tutorial part. The step by step break down for the android app is as follows:
  • Add the uses-permission in Android Manifest file.
    <uses-permission android:name="android.permission.INTERNET"/>
  • Add the dependency for Android Volley in build.gradle (Module: app).
    compile 'com.android.volley:volley:1.0.0'
  • Write the code to send request to server for login or sign up.
  • Write the server side code. For this tutorial I am just sending success from the server for both login.php and signup.php.
    <?php echo "success"; ?>
And that all. You are done with the Android App for Login and Sign Up. You can get the complete android app code with back-end at Github Repository. Or you can get the code below in this post for login and sign up classes.

LoginActivity.java


SignUp.java


In case of error

If you get some error, the first thing you should check is permissions in android androidManifest.xml and build.gradle. If you still get the error feel free to comment below or contact me at farooqahmadkhan003@gmail.com.

Saturday, 28 January 2017

Android App for Login Sign Up Form Screen Designing

Every android application has login and registration procedure for authenticating or you can say tracking its users. Today's android tutorial is about designing the login and registration page for android application. Note that this tutorial is just about making the front end designs of the screen. We will cover the back-end coding, database management and sending requests to server in next tutorial. We will be building complete android app with fully functional login and signup with real time database in a step by step. Here is the demo Android App video.


This task is pretty easy now. You already have a template in Android Studio for login activity. And you can make changes according to your need like adding you logo, adding background image, and changing design, which we will learn in this tutorial. Now we should start with tutorial for our android app. Here is the final look of our Login/Signup screens.

sign up activity for android app
Sign Up Activity
login activity for android app
Login Activity

Lets start coding our android app. Step by step instructions are:

  • Create an android studio project.
  • Select the Login Activity template for launching activity of android app.
  • Create new activity named SignUp with Login Activity template.
  • Make necessary changes in the design according to your need.
You can get the complete android app code with back-end at Github Repository. Or you can get the code below in this post for login and sign up screens.

activity_sign_up.xml

activity_login.xml


Next Step

Now the next step is to make these screens functional. And fortunately, Android Studio does most of that part too. We just need to send the request for sign up and login to server and make authentication. For that part follow the next part of tutorial.